| 일 | 월 | 화 | 수 | 목 | 금 | 토 |
|---|---|---|---|---|---|---|
| 1 | 2 | 3 | 4 | 5 | 6 | 7 |
| 8 | 9 | 10 | 11 | 12 | 13 | 14 |
| 15 | 16 | 17 | 18 | 19 | 20 | 21 |
| 22 | 23 | 24 | 25 | 26 | 27 | 28 |
- Express
- 판다스
- 알고풀자
- 블랙스크린복구
- 스트림릿
- Jinja2
- 디자드
- EnhancedInput
- R
- nixos한글설정\
- flask
- 지우개신공 #pc자기진단 #ram미인식 #컴퓨터고장해결 #램인식불량 #pc자가수리 #컴퓨터고장해결 #조립pc
- 미니프로젝트
- 파이썬서버
- streamlit
- 마인크래프트뮤지컬
- 으
- ossca
- pandas
- 프메
- JWT
- Bootstrap4
- inxos
- VUE
- 언리얼뮤지컬
- 오픈소스
- Enhanced Input System
- 정글사관학교
- 메모리인식불량
- nixos한글키보드
- Today
- Total
Today, I will
[Open GL] opengl-tutorial matrices 본문
https://www.opengl-tutorial.org/beginners-tutorials/tutorial-3-matrices/
Tutorial 3 : Matrices
The engines don’t move the ship at all. The ship stays where it is and the engines move the universe around it. Futurama This is the single most important tutorial of the whole set. Be sure to read it at least eight times. Homogeneous coordinates Until t
www.opengl-tutorial.org
*open gl 튜토리얼을 보고 개인 학습용으로 기록한 포스팅입니다.
The engines don’t move the ship at all. The ship stays where it is and the engines move the universe around it.
Futurama
Homogeneous coordinates 동차좌표계
Homogeneous 좌표는 쉽게 말하면 (x, y)를 (x, y, 1)로 표현하는 것이다. 일반화하면 임의의 0이 아닌 상수 w에 대해 (x, y)를 (wx, wy, w)로 표현하는 것이다. homogeneous 좌표계에서 스케일(scale)은 무시되며 (x, y)에 대한 homogeneous 좌표 표현은 무한히 많이 존재하게 된다. 마찬가지로, 3차원의 경우에는 (X, Y, Z)를 (X, Y, Z, 1) 나 (wX, wY, wZ, w)로 표현한다.
homogeneous 좌표에서 원래의 좌표를 구하려면 끝 자리가 1이 되도록 scale을 바꾼 후 1을 때내면 된다. (x, y, α)는 (x/α, y/α, 1)과 같으며 실제 2D 좌표는 (x/α, y/α)이 된다.
homogeneous 좌표계를 사용하면 affine 변환이나 perspective(projective) 변환을 하나의 단일(single) 행렬로 표현할 수 있기 때문에 컴퓨터 그래픽스에서 항시 활용된다.
3D 정점을 (x,y,z)로만 간주했다면, w를 끼워넣으면 이제 (x,y,z,w) 벡터를 가질 수 있게 된다.
- w == 1이면 벡터 (x,y,z,1)는 공간상의 위치
- w == 0이면 벡터 (x,y,z,0)는 방향
회전의 경우 : 점이나 방향을 회전하면 동일한 결과를 얻는다.
변환 행렬
3D 그래픽에서는 주로 4x4 행렬을 사용한다. 이를 통해 (x,y,z,w) 정점을 변환할 수 있다. 이는 정점에 행렬을 곱하여 수행된다.
행렬 x 정점(이 순서대로!!) = TransformedVertex

C++에서 GLM을 사용하면 다음과 같다.
glm::mat4 myMatrix;
glm::vec4 myVector;
// fill myMatrix and myVector somehow
glm::vec4 transformedVector = myMatrix * myVector; // Again, in this order ! this is important.
GLSL에서 :
mat4 myMatrix;
vec4 myVector;
// fill myMatrix and myVector somehow
vec4 transformedVector = myMatrix * myVector; // Yeah, it's pretty much the same than GLM
(1) 이동 행렬
이는 이해하기 가장 간단한 변환 행렬이다.

여기서 X,Y,Z는 위치에 추가하려는 값이다.
따라서 10단위의 벡터(10,10,10,1)를 X 방향으로 변환하려면 다음과 같다.

(20,10,10,1) 동차 벡터를 얻었다. Remember, the 1 means that it is a position, not a direction. So our transformation didn’t change the fact that we were dealing with a position, which is good.
-z 축 방향을 나타내는 벡터 (0,0,-1,0) 에 어떤 일이 발생하는지 아래와 같이 살펴보면,

원래의 (0,0,-1,0) 방향이다. moving a direction does not make sense.
코드로의 작성은 C++에서 GLM을 사용하면 다음과 같다.
#include <glm/gtx/transform.hpp> // after <glm/glm.hpp>

glm::mat4 myMatrix = glm::translate(glm::mat4(), glm::vec3(10.0f, 0.0f, 0.0f));
glm::vec4 myVector(10.0f, 10.0f, 10.0f, 0.0f);
glm::vec4 transformedVector = myMatrix * myVector; // guess the result
GLSL에서 :
vec4 transformedVector = myMatrix * myVector;
사실, GLSL에서는 거의 이런 일을 하지 않는다.
대부분의 경우 C++에서 glm::translate()를 사용하여 행렬을 계산하고 GLSL로 보내고 곱셈만 수행한다.
(2) 항등 행렬 The Identity matrix
A에 1.0을 곱하면 A가 나온다는 것을 아는 것만큼 중요한 항등행렬

C++에서:
glm::mat4 myIdentityMatrix = glm::mat4(1.0f);(3) Scaling matrices
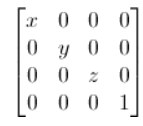
벡터(위치나 방향은 중요하지 않음)의 크기를 모든 방향에서 2.0으로 조정하려는 경우:

방향의 크기 조정은 어떠한 경우에는 유용할 수 있다.
(단위 행렬은 (X,Y,Z) = (1,1,1)인 스케일링 행렬의 특별한 경우일 뿐이다.)
C++에서:
// Use #include <glm/gtc/matrix_transform.hpp> and #include <glm/gtx/transform.hpp>
glm::mat4 myScalingMatrix = glm::scale(2.0f, 2.0f ,2.0f);
(4) Rotation matrices 회전 행렬
C++에서:
// Use #include <glm/gtc/matrix_transform.hpp> and #include <glm/gtx/transform.hpp>
glm::vec3 myRotationAxis( ??, ??, ??);
glm::rotate( angle_in_degrees, myRotationAxis );
(5) Cumulating transformations 누적 변환
이제 벡터를 회전하고, 이동하고, 크기를 조정하는 방법을 알았다. 이러한 변환을 결합하면 좋을 것이다.
이는 행렬을 함께 곱하여 수행된다.
TransformedVector = TranslationMatrix * RotationMatrix * ScaleMatrix * OriginalVector;
조심 위 줄은 실제로 크기 조정을 먼저 수행한 다음 회전, 그런 다음 변환을 수행한다. 이것이 행렬 곱셈이 작동하는 방식이다.
C++에서 GLM 사용:
glm::mat4 myModelMatrix = myTranslationMatrix * myRotationMatrix * myScaleMatrix;
glm::vec4 myTransformedVector = myModelMatrix * myOriginalVector;
GLSL에서 :
mat4 transform = mat2 * mat1;
vec4 out_vec = transform * in_vec;
(6) The Model, View and Projection matrices
모델, 뷰 및 투영 행렬은 변환을 깔끔하게 분리하는 편리한 도구이다.
The Model matrix
정점이 (0,0,0)에 있으면 개체 중심에 있는 것이다.

translation*rotation*scale 이 행렬을 각 프레임(C++가 아닌 GLSL)의 모든 정점에 적용하면 모든 것이 움직인다. 움직이지 않는 것이 세상의 중심에 있을 것이다 .
You apply this matrix to all your vertices at each frame (in GLSL, not in C++!) and everything moves. Something that doesn’t move will be at the center of the world.

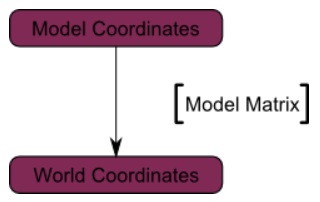
정점은 이제 World Space에 있다.(아래 이미지의 검은색 화살표의 의미) 모델 공간(모델 중심을 기준으로 정의된 모든 정점)에서 월드 공간(모든 정점이 세계 중심을 기준으로 정의됨)으로 이동했다.

다이어그램으로 요약 :
The View matrix
엔진은 배를 전혀 움직이지 않는다. 배는 그 자리에 머물고 엔진은 배 주위의 우주를 움직인다.
카메라도 마찬가지이다. 다른 각도에서 산을 보고 싶다면 카메라를 움직일 수 있다.
처음에는 카메라가 World Space의 원점에 있다. 세상을 움직이려면 또 다른 매트릭스를 도입하면 된다.
initially your camera is at the origin of the World Space. In order to move the world, you simply introduce another matrix.

Let’s say you want to move your camera of 3 units to the right (+X). This is equivalent to moving your whole world (meshes included) 3 units to the LEFT ! (-X). While you brain melts, let’s do it :
3개 단위의 카메라를 오른쪽(+X)으로 이동한다 이는 전체 세계(메시 포함)를 왼쪽으로 3단위 이동하는 것과 같다.
// Use #include <glm/gtc/matrix_transform.hpp> and #include <glm/gtx/transform.hpp>
glm::mat4 ViewMatrix = glm::translate(glm::mat4(), glm::vec3(-3.0f, 0.0f ,0.0f));
Again, the image below illustrates this : We went from World Space (all vertices defined relatively to the center of the world, as we made so in the previous section) to Camera Space (all vertices defined relatively to the camera).
World Space(이전 섹션에서 만들었듯이 모든 정점은 세계의 중심을 기준으로 정의됨)에서 Camera Space(모든 정점은 카메라를 기준으로 정의됨)로 이동했다.

GLM의 뛰어난 glm::lookAt 기능
glm::mat4 CameraMatrix = glm::lookAt(
    cameraPosition, // the position of your camera, in world space
    cameraTarget,   // where you want to look at, in world space
    upVector        // probably glm::vec3(0,1,0), but (0,-1,0) would make you looking upside-down, which can be great too
);
	// Camera matrix
	glm::mat4 View       = glm::lookAt(
								glm::vec3(4,3,3), // Camera is at (4,3,3), in World Space
								glm::vec3(0,0,0), // and looks at the origin
								glm::vec3(0,1,0)  // Head is up (set to 0,-1,0 to look upside-down)
						   );
다이어그램은 다음과 같다.
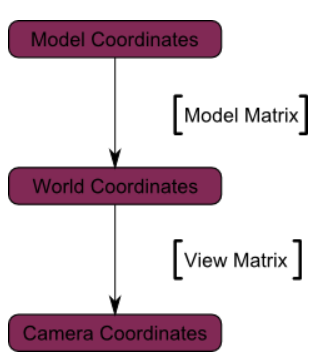
우리는 이제 카메라 공간에 있다. 이는 일련의 모든 변환 후에 x==0 및 y==0을 갖는 정점이 화면 중앙에 렌더링되어야 함을 의미한다. 하지만 객체가 화면에 배치되어야 하는 위치를 결정하기 위해 x 및 y 좌표만 사용할 수는 없다. 카메라까지의 거리(z)도 중요하다.
The Projection matrix 투영 행렬
x 및 y 좌표가 비슷한 두 정점의 경우 가장 큰 z 좌표를 가진 정점이 다른 정점보다 화면 중앙에 더 많이 위치한다.
이를 원근 투영이라고 한다.
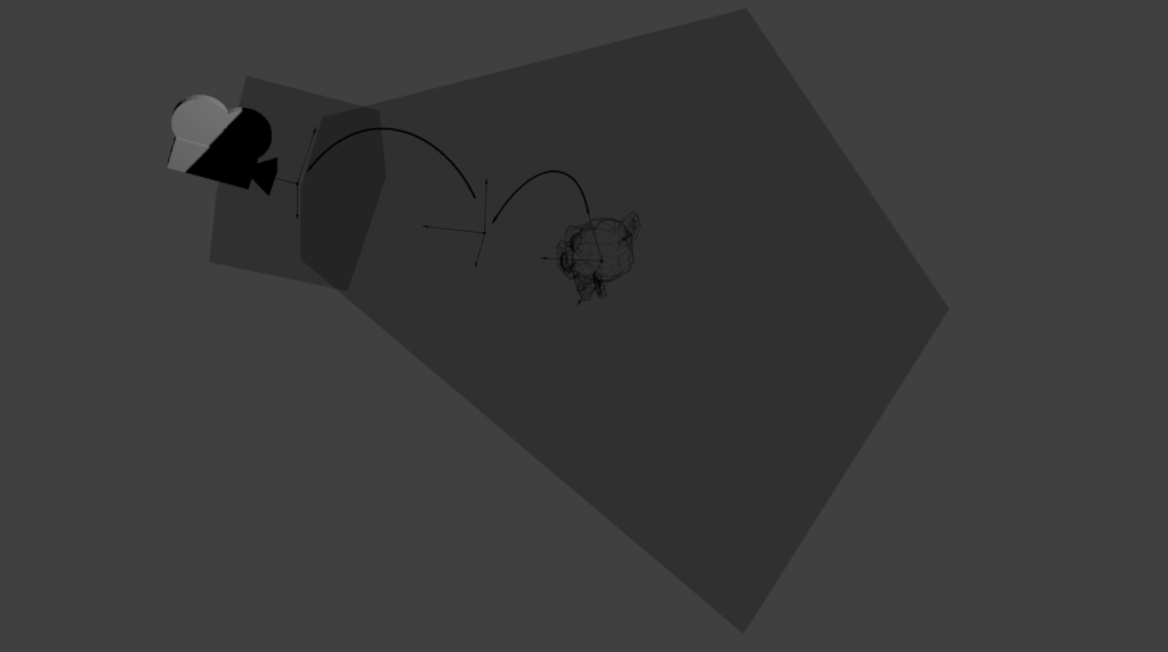
4x4 행렬은 이 투영을 나타낼 수 있다 :
// Generates a really hard-to-read matrix, but a normal, standard 4x4 matrix nonetheless
glm::mat4 projectionMatrix = glm::perspective(
    glm::radians(FoV), // The vertical Field of View, in radians: the amount of "zoom". Think "camera lens". Usually between 90° (extra wide) and 30° (quite zoomed in)
    4.0f / 3.0f,       // Aspect Ratio. Depends on the size of your window. Notice that 4/3 == 800/600 == 1280/960, sounds familiar ?
    0.1f,              // Near clipping plane. Keep as big as possible, or you'll get precision issues.
    100.0f             // Far clipping plane. Keep as little as possible.
);
카메라 공간(카메라에 대해 상대적으로 정의된 모든 정점)에서 동종 공간(모든 정점이 작은 큐브에 정의됨. 큐브 내부의 모든 것이 화면에 표시됨)으로 이동했다.
최종 다이어그램

이 투영 작업에 어떤 일이 일어나는지 더 잘 이해할 수 있도록 또 다른 다이어그램이 있다. 투영하기 전에 카메라 공간에 파란색 객체가 있고 빨간색 모양은 카메라 절두체, 즉 카메라가 실제로 볼 수 있는 장면 부분을 나타낸다.
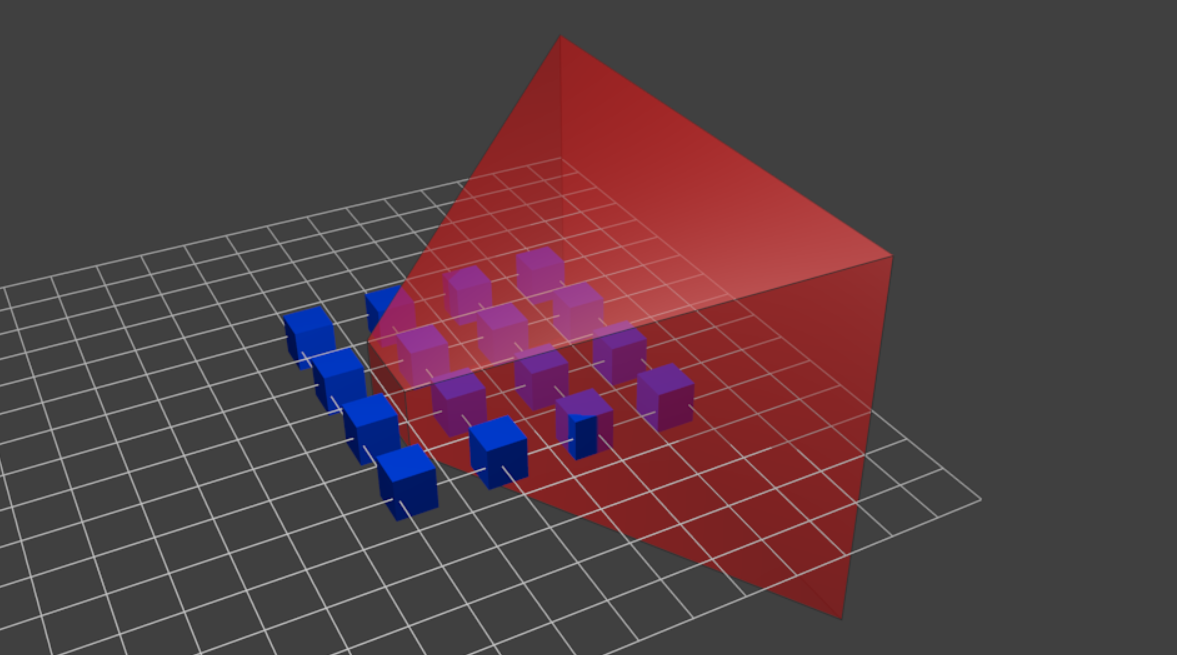
투영 매트릭스를 모든 것에 곱하면 다음과 같은 효과가 있다.

이 이미지에서 절두체는 이제 완벽한 정육면체(모든 축에서 -1과 1 사이이므로 보기가 약간 어렵다)이며, 모든 파란색 개체도 같은 방식으로 변형되었다. 따라서 카메라 근처에 있는 물체(=우리가 볼 수 없는 입방체의 면 근처)는 크고 나머지는 더 작다.
절두체 "뒤"에서 어떻게 보이는지 살펴보면,
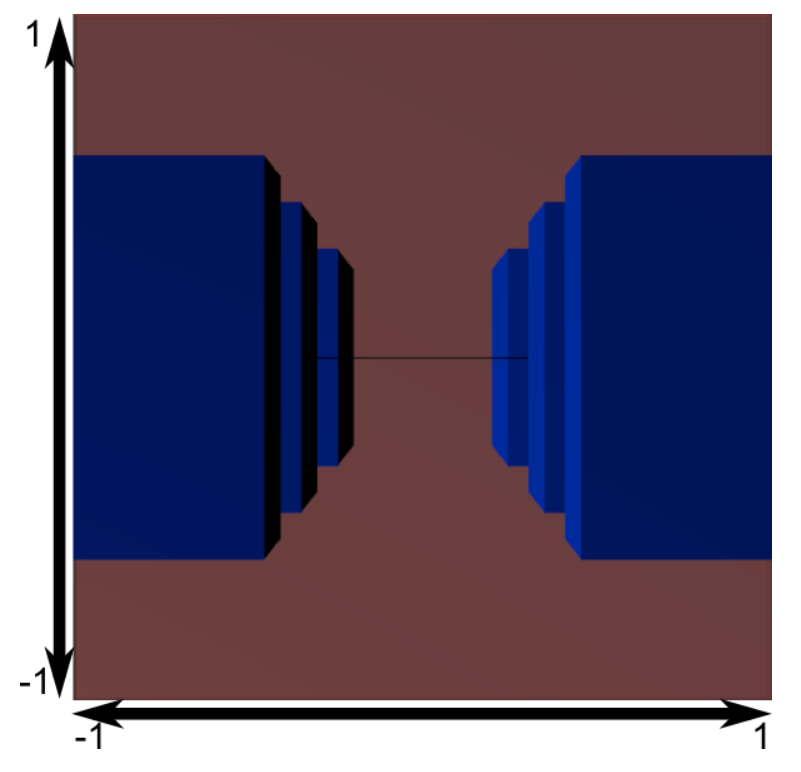
너무 정사각형이므로 실제 창 크기에 맞추기 위해 또 다른 수학적 변환이 적용된다(이것은 자동이므로 셰이더에서 직접 수행할 필요가 없다).
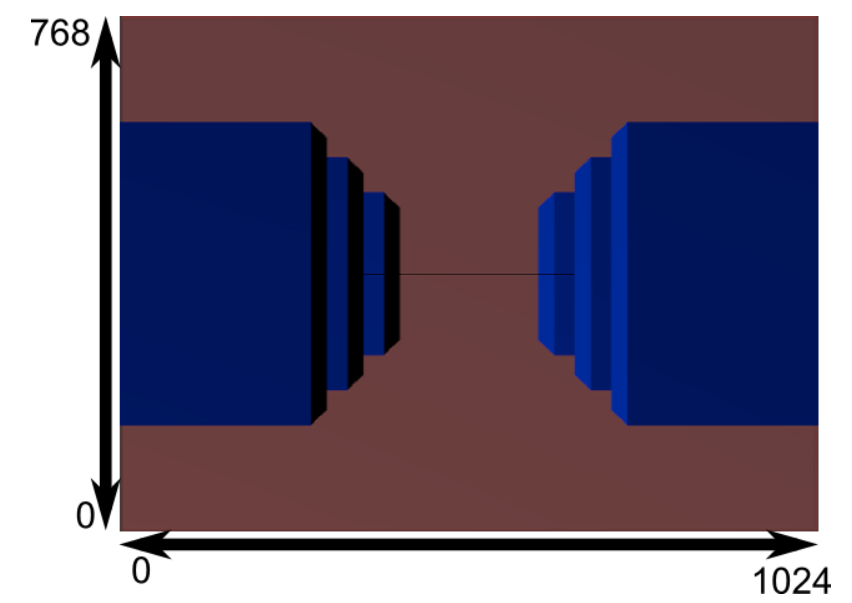
그리고 이것이 실제로 렌더링된 이미지이다.
표준 행렬 곱셈
// C++ : compute the matrix
glm::mat4 MVPmatrix = projection * view * model; // Remember : inverted !
// GLSL : apply it
transformed_vertex = MVP * in_vertex;
Cumulating transformations : the ModelViewProjection matrix
- 첫 번째 단계: GLM GTC 매트릭스 변환 기능을 포함
#include <glm/gtc/matrix_transform.hpp>
- 두 번째 단계: MVP 매트릭스를 생성. 렌더링하는 각 모델에 대해 이 작업을 수행해야 한다.
// Projection matrix : 45° Field of View, 4:3 ratio, display range : 0.1 unit <-> 100 units
glm::mat4 Projection = glm::perspective(glm::radians(45.0f), (float) width / (float)height, 0.1f, 100.0f);

// Or, for an ortho camera :
//glm::mat4 Projection = glm::ortho(-10.0f,10.0f,-10.0f,10.0f,0.0f,100.0f); // In world coordinates

// Camera matrix
glm::mat4 View = glm::lookAt(
    glm::vec3(4,3,3), // Camera is at (4,3,3), in World Space
    glm::vec3(0,0,0), // and looks at the origin
    glm::vec3(0,1,0)  // Head is up (set to 0,-1,0 to look upside-down)
    );

// Model matrix : an identity matrix (model will be at the origin)
glm::mat4 Model = glm::mat4(1.0f);
// Our ModelViewProjection : multiplication of our 3 matrices
glm::mat4 mvp = Projection * View * Model; // Remember, matrix multiplication is the other way around
- 세 번째 단계: GLSL에 전달
// Get a handle for our "MVP" uniform
// Only during the initialisation
GLuint MatrixID = glGetUniformLocation(programID, "MVP");

// Send our transformation to the currently bound shader, in the "MVP" uniform
// This is done in the main loop since each model will have a different MVP matrix (At least for the M part)
glUniformMatrix4fv(MatrixID, 1, GL_FALSE, &mvp[0][0]);
- 네 번째 단계: GLSL에서 이를 사용하여 정점을 다음과 같이 변환
- SimpleVertexShader.vertexshader
// Input vertex data, different for all executions of this shader.
layout(location = 0) in vec3 vertexPosition_modelspace;

// Values that stay constant for the whole mesh.
uniform mat4 MVP;

void main(){
  // Output position of the vertex, in clip space : MVP * position
  gl_Position =  MVP * vec4(vertexPosition_modelspace,1);
}
	// Camera matrix
	glm::mat4 View       = glm::lookAt(
								glm::vec3(4,3,3), // Camera is at (4,3,3), in World Space
								glm::vec3(0,0,0), // and looks at the origin
								glm::vec3(0,-1,0)  // Head is up (set to 0,-1,0 to look upside-down)
						   );
	// Model matrix : an identity matrix (model will be at the origin)
	glm::mat4 Model      = glm::mat4(1.0f);
	// Our ModelViewProjection : multiplication of our 3 matrices
	glm::mat4 MVP        = Projection * View * Model; // Remember, matrix multiplication is the other way around
- 완료 ! 여기에 튜토리얼 2와 동일한 삼각형이 있다.
- 여전히 원점(0,0,0)에 있지만 점(4,3,3)에서 관점으로 보면 머리가 위로(0,1,0), 45°

참고 문헌
동차 좌표계 https://darkpgmr.tistory.com/78
이동 행렬 https://blog.naver.com/destiny9720/221408760120
'Open GL' 카테고리의 다른 글
| [Open GL] LearnOpenGL hello_triangle_exercise 1, 2, 3 (0) | 2023.11.21 |
|---|---|
| [Open GL] LearnOpenGL many Triangles with Uniform Variables (0) | 2023.11.21 |
| [GLSL] 쉐이더 프로세서의 인풋,아웃풋 레지스터 (0) | 2023.11.17 |
| [Open GL] Tutorial 4 : A Colored Cube 예제풀이 (1) | 2023.10.30 |
| [Open GL] opengl-tutorial 2 first triangle (0) | 2023.10.27 |


